

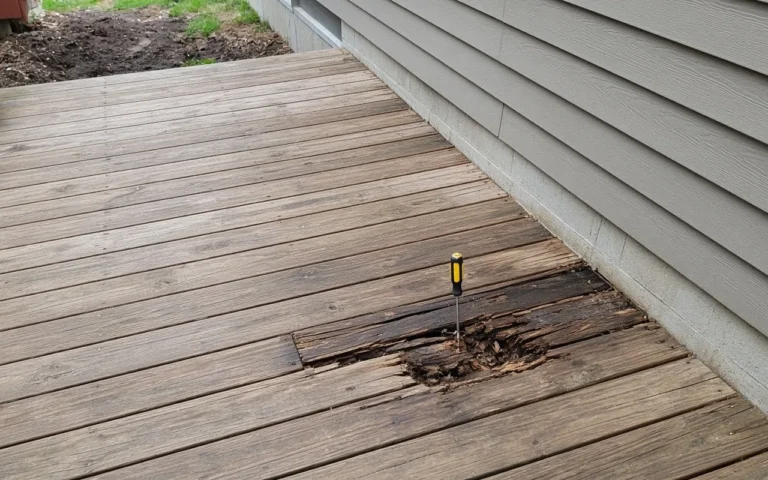
Repairing cracked and rotted deck boards is essential for maintaining the safety and aesthetics of your outdoor space. This process involves assessing damage, selecting appropriate materials, and executing repairs effectively. Proper techniques can extend the life of your wood decking and enhance its appearance.
Evaluate Damage on Deck Boards
Before starting any repair, it is crucial to evaluate the extent of damage on your deck boards. Look for signs of cracking, rotting, or warping. Understanding the severity of the damage helps determine whether you need to replace boards or if repairs are sufficient.
Cracks: Small surface cracks can often be repaired with fillers, while deep cracks may require replacement.
Rot: Rotted boards will need to be removed and replaced entirely to ensure structural integrity.
Warping: Warped boards can sometimes be straightened, but often replacement is necessary.
Decking Damage Diagnostic Guide
When it comes to maintaining a wood deck, identifying damage is the first crucial step in ensuring its longevity. This guide will help you recognize the signs of cracked and rotted deck boards, equipping you with the knowledge needed to assess the condition of your decking. Understanding these issues will enable you to take timely action and preserve your outdoor space.
| Symptom | Primary Suspect | Difficulty (1-5) |
|---|---|---|
| Surface cracks | Weather exposure | 2 |
| Rotted boards | Moisture damage | 4 |
| Warped boards | Poor installation | 3 |
Gather Essential Repair Supplies
Before tackling wood decking repair, it’s crucial to gather the right supplies to ensure a successful fix for cracked and rotted deck boards. Having the necessary tools and materials on hand will streamline the process and help achieve a durable, long-lasting result. This section outlines the essential items you’ll need to get started on your repair project.
Having the right tools and materials is vital for effective repairs. Here is a checklist of essential items you will need:
Replacement boards: Choose pressure-treated lumber or composite materials for durability.
Wood filler: Use a high-quality exterior wood filler for minor cracks.
Wood preservative: Apply a preservative to prevent future rot.
Screws: Use corrosion-resistant screws for securing boards.
Safety gear: Wear gloves, goggles, and a dust mask during repairs.
Safety Precautions for Deck Repairs
Before embarking on any wood decking repair project, it’s crucial to prioritize safety. Working with tools and materials can pose risks, especially when dealing with cracked or rotted boards. Understanding and implementing the necessary safety precautions will help ensure a secure and efficient repair process.
Before starting repairs, ensure you take necessary safety precautions. Clear the area of debris and ensure a stable working surface.
Disconnect power: If your deck has electrical features, disconnect power to avoid accidents.
Wear protective gear: Always wear gloves and goggles to protect against splinters and dust.
Check for pests: Inspect for any signs of insect damage before beginning repairs.
Deck Board Repair Techniques
When faced with cracked or rotted deck boards, knowing the right repair techniques can save your outdoor space. This section outlines effective methods to restore the integrity and appearance of your wood decking, ensuring it remains safe and visually appealing for years to come. Whether you’re a DIY enthusiast or a seasoned homeowner, these tips will guide you through the repair process.
Once you have assessed the damage and gathered supplies, follow these steps to execute repairs effectively.
Remove damaged boards: Use a pry bar to carefully lift rotted or cracked boards.
Prepare the area: Clean the joists and surrounding areas to ensure a solid base.
Cut replacement boards: Measure and cut new boards to fit the existing structure.
Secure new boards: Fasten the new boards using corrosion-resistant screws.
Fill cracks: For minor cracks, apply wood filler and sand smooth once dry.
Apply preservative: Treat the entire deck with a wood preservative to protect against future damage.
Repair Methods for Cracked and Rotted Deck Boards
Repairing cracked and rotted deck boards is essential for maintaining the safety and aesthetics of your outdoor space. This section outlines effective methods to address these common issues, ensuring your wood decking remains sturdy and visually appealing. Whether you’re dealing with minor cracks or significant rot, these approaches will guide you through the repair process.
Different repair techniques can be applied based on the type of damage.
Filling cracks: Use wood filler for small surface cracks. Ensure it is applied evenly and sanded smooth.
Board replacement: For rotted sections, remove and replace with new boards. Ensure they are properly secured.
Warp correction: If boards are warped, try to straighten them with clamps before securing.
Maintain Deck Boards for Longevity
Proper maintenance of deck boards is essential for ensuring their longevity and preventing costly repairs. Regular inspections and timely interventions can significantly extend the life of your wood decking, allowing you to enjoy your outdoor space without the worry of deterioration. Understanding the key practices for maintaining deck boards will help you keep them in optimal condition year-round.
After repairs, regular maintenance is essential to prolong the life of your deck boards.
Seal regularly: Apply a water-repellent sealant every few years.
Clean debris: Regularly sweep off leaves and debris to prevent moisture buildup.
Inspect annually: Conduct an annual inspection for signs of damage or wear.
Deck Maintenance and Inspection Guide
Regular maintenance and thorough inspections are essential for preserving the integrity of your wood decking. By identifying potential issues early, you can prevent more extensive damage and ensure your outdoor space remains safe and inviting. This guide will help you understand the key aspects of deck maintenance and what to look for during inspections.
| Task | Frequency |
|---|---|
| Seal deck | Every 2-3 years |
| Clean debris | Monthly |
| Inspect for damage | Annually |
Essential Maintenance Tips for Wood Decking
Maintaining wood decking is crucial for preserving its beauty and longevity. Regular upkeep not only enhances the appearance of your deck but also prevents costly repairs down the line. This section outlines essential maintenance tips to keep your wood decking in top condition, ensuring it remains a safe and inviting outdoor space.
Properly repairing and maintaining your wood decking can prevent costly replacements in the future. Always address issues promptly to avoid further damage. Regular inspections and maintenance will keep your deck looking great and safe for use.
For more repairs like this, start in the Rot & Outdoor Wood hub. If you are working through a related problem next, see How to Fix Rotten Wood on the House: Exterior Siding Repair or Wood Deck Surface Repair (Professional Tips for Outdoor Maintenance).
