
Close Menu
Woodwork InsightsWoodwork Insights
    Facebook X (Twitter) Instagram
    Woodwork InsightsWoodwork Insights
    • Home
    • Repairing Wood
    • About
    • Contact
    • Privacy Policy
    Woodwork InsightsWoodwork Insights
    Home»Repairing Wood»Wood Subfloor Repair: How to Fix Rot and Sagging Floor Joists
    Repairing Wood

    Wood Subfloor Repair: How to Fix Rot and Sagging Floor Joists

    Evan MarkhamBy Evan MarkhamJune 15, 2026No Comments7 Mins Read
    Facebook Twitter Pinterest LinkedIn Tumblr WhatsApp Email
    Share
    Facebook Twitter LinkedIn WhatsApp Pinterest Email

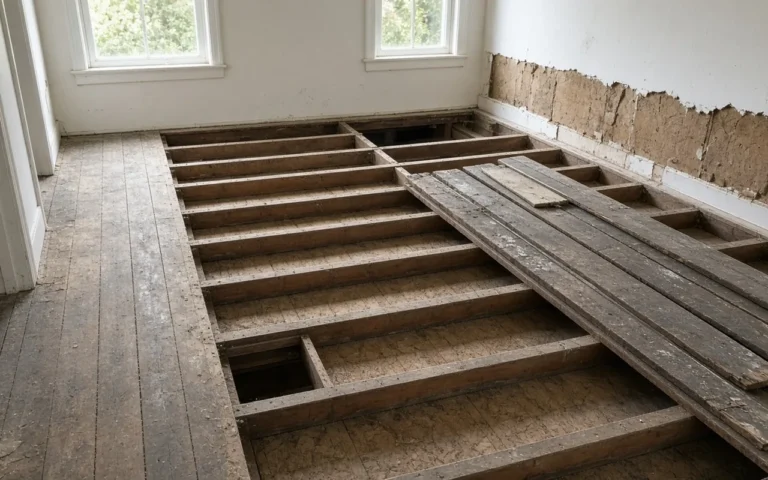
    Repairing a wood subfloor with rot and sagging floor joists requires a systematic approach to restore stability and safety. This process involves assessing the damage, replacing affected materials, and reinforcing the structure to prevent future issues.

    Signs of Subfloor Damage and Deterioration

    Identifying the signs of subfloor damage is crucial for maintaining the integrity of your home. Look for indicators such as sagging floors, soft spots, and visible rot, as these can signal underlying issues with your floor joists. Recognizing these warning signs early can help prevent more extensive repairs down the line.

    Recognizing the signs of subfloor damage is crucial for timely repairs. Common symptoms include sagging floors, soft spots, and visible mold or rot. Early detection can save time and money by preventing further deterioration.

    Subfloor Damage Diagnostic Guide

    Identifying subfloor damage is crucial for effective repair, especially when dealing with rot and sagging floor joists. This diagnostic guide outlines the key signs of deterioration, helping you assess the condition of your wood subfloor. By understanding these indicators, you can take the necessary steps to restore your flooring’s integrity and ensure a stable foundation.

    Symptom Primary Suspect Difficulty 1-5
    Sagging floors Rotting joists 3
    Soft spots Water damage 4
    Mold presence Moisture issues 2
    Creaking sounds Loose connections 3

    Gather Essential Repair Supplies

    Before diving into wood subfloor repair, it’s crucial to gather the necessary supplies to ensure a successful project. Having the right tools and materials on hand will streamline the process of fixing rot and sagging floor joists, allowing you to address the issues effectively and efficiently. This preparation sets the foundation for a durable and lasting repair.

    Before starting the repair process, ensure you have all necessary tools and materials. This preparation minimizes delays and enhances efficiency.

    Essential Safety Gear for Subfloor Repair

    When tackling wood subfloor repair, ensuring your safety is paramount. The right gear not only protects you from potential hazards but also enhances your efficiency during the repair process. This section outlines the essential safety equipment you’ll need to safeguard yourself while addressing rot and sagging floor joists.

    • Safety gear: Gloves, goggles, dust mask

    • Tools: Circular saw, pry bar, hammer, drill

    • Materials: Replacement floor joists, plywood, wood glue, screws

    • Sealants: Waterproof sealant for moisture protection

    See Also  Paint Runs on Wood Repair: How to Sand and Blend Smoothly

    Workspace Safety and Organization for Repairs

    Before diving into wood subfloor repair, ensuring a safe and organized workspace is essential. Proper safety measures and a clutter-free environment not only protect you during the repair process but also enhance efficiency. This section outlines key practices to create a secure and effective workspace for tackling rot and sagging floor joists.

    Creating a safe and organized workspace is vital for effective repairs. Clear the area of furniture and debris to avoid accidents. Ensure proper ventilation, especially if using sealants or adhesives.

    Subfloor Preparation and Safety Measures

    Before embarking on wood subfloor repair, it’s crucial to prepare the area properly and prioritize safety. Understanding the necessary precautions and steps to take will ensure a smoother repair process while minimizing risks. This section outlines essential preparation techniques and safety measures to protect both yourself and your workspace.

    1. Remove furniture from the area.

    2. Inspect for any electrical or plumbing lines that may be affected.

    3. Set up proper lighting to enhance visibility.

    4. Wear safety gear to protect against dust and debris.

    Execute the Repair Process

    Repairing wood subfloors requires a systematic approach to address issues like rot and sagging floor joists. This section outlines the essential steps involved in executing the repair process, ensuring that your flooring is restored to its original strength and stability. Following these guidelines will help you achieve a durable and lasting solution for your subfloor problems.

    Once the area is prepared, follow these steps to repair the subfloor and floor joists effectively. Each step ensures a solid and durable floor structure.

    Rot Assessment for Floor Joists

    Assessing rot in floor joists is crucial for ensuring the structural integrity of your home. Identifying the extent of damage early can prevent further deterioration and costly repairs. This section will guide you through the steps to effectively evaluate the condition of your floor joists and determine the necessary actions for restoration.

    1. Assess the extent of rot in the floor joists.

    2. Cut out damaged sections using a circular saw.

    3. Replace with new floor joists secured with screws.

    4. Install new plywood over the joists, ensuring a tight fit.

    5. Apply wood glue to joints for added strength.

    6. Seal the area with waterproof sealant to prevent future moisture issues.

    See Also  Heavy Coat of Wood Stain: Professional Level Blending and Prep Hacks

    Subfloor Repair Process Breakdown

    Repairing a wood subfloor requires a systematic approach to address issues like rot and sagging floor joists. Understanding the step-by-step process is crucial for effectively restoring structural integrity and ensuring a safe, stable surface. This section will guide you through each phase of the repair, providing clear instructions and essential tips for success.

    Step Action Tools/Materials Needed
    1 Assess damage None
    2 Cut out rot Circular saw
    3 Replace joists New floor joists, screws
    4 Install plywood New plywood, screws
    5 Apply glue Wood glue
    6 Seal area Waterproof sealant

    Subfloor Reinforcement Techniques for Stability

    When dealing with sagging floor joists and rotting wood subflooring, reinforcing the subfloor is crucial for restoring stability and preventing further damage. This section outlines effective techniques to strengthen your subfloor, ensuring a solid foundation that supports your home’s structure and enhances overall safety. Implementing these methods can help you achieve a durable and reliable flooring system.

    After repairing the subfloor, reinforcing the structure is essential for preventing future sagging. This involves adding support beams or brackets.

    Subfloor Support Beam Installation

    When addressing issues with a sagging floor, installing support beams is a crucial step in restoring stability to your subfloor. This process involves careful measurement and placement to ensure that the beams effectively bear the load and prevent further damage. Understanding the proper techniques for installation will help you achieve a solid foundation for your flooring.

    • Install additional support beams under the subfloor.

    • Use joist hangers to secure joists in place.

    • Consider cross-bracing for extra stability.

    Managing Subfloor Moisture for Longevity

    Managing moisture is crucial for maintaining the integrity of wood subfloors and preventing issues like rot and sagging joists. Understanding how to control humidity and water exposure can significantly extend the lifespan of your flooring. This section explores effective strategies to keep moisture at bay and ensure a stable, durable subfloor.

    See Also  How to Fix Swollen Wood Countertop: Leveling and Resealing

    Moisture is a primary cause of subfloor rot. Taking steps to manage moisture can significantly extend the life of your repairs.

    Leak Detection Strategies for Subfloor Integrity

    Detecting leaks is crucial for maintaining the integrity of your wood subfloor. Identifying the source of moisture can prevent further damage to floor joists and help you address issues before they escalate. This section outlines effective strategies for pinpointing leaks and ensuring a stable foundation for your flooring.

    • Inspect for leaks in plumbing or roofing.

    • Ensure proper drainage around the foundation.

    • Install a vapor barrier in crawl spaces to reduce humidity.

    Post-Repair Inspection and Maintenance Tips

    After addressing the issues of rot and sagging floor joists, it’s crucial to ensure the integrity of your repairs through careful inspection and ongoing maintenance. This section provides essential tips to help you evaluate your work and maintain a stable, safe subfloor for years to come. Regular checks and preventive measures can significantly extend the life of your flooring.

    After completing repairs, conduct a thorough inspection. Check for any remaining soft spots or signs of moisture. Regular maintenance can help catch issues early.

    Moisture Management for Subfloor Integrity

    Moisture management is crucial for maintaining the integrity of wood subfloors and preventing issues like rot and sagging floor joists. Understanding how moisture infiltrates your home and affects the subfloor can help you implement effective strategies to protect your investment. This section outlines key practices to manage moisture effectively and ensure a stable, long-lasting subfloor.

    Neglecting to address moisture can lead to recurring rot and structural failure.

    Take Action to Repair Subfloor

    When faced with rotting or sagging floor joists, taking prompt action is essential to prevent further damage and ensure structural integrity. This section outlines the necessary steps and techniques for effectively repairing your wood subfloor, providing clear guidance to help you tackle the issue confidently and efficiently.

    Fixing a wood subfloor with rot and sagging floor joists is a manageable task. With the right tools, materials, and techniques, you can restore your flooring to a safe and stable condition.

    Share. Facebook Twitter Pinterest LinkedIn Tumblr WhatsApp Email
    Evan Markham
    Evan Markham
    • Website

    I grew up in a small Midwestern town where weekends meant sawdust on my jeans and the sound of my dad’s old table saw running in the garage. Woodworking became my favorite way to unwind long before I ever thought about turning it into a career. Over the years I’ve built everything from simple shelves to full backyard pergolas, and I’ve picked up plenty of mistakes and lessons along the way. I started Woodwork Insights because I wanted a place to share those lessons in a way that feels honest and useful. My projects aren’t perfect and I don’t pretend they are. They’re real builds done with real tools in an everyday workshop. If you’re into practical tips, straightforward guides, and down-to-earth woodworking advice, then you’ll feel right at home with me here. I’m always working on something new, usually with a half-finished cup of coffee somewhere on the workbench.

    Related Posts

    Stains on Wood Furniture: Fast and Easy Removal Strategies

    July 1, 2026

    How to Fix Wood Veneer (Pro Tips for Peeling and Bubbles)

    July 1, 2026

    Nail Polish Stain on Wood: Professional Level Removal and Refinishing

    July 1, 2026

    Hole in a Stained Wood Door: How to Match Color Perfectly

    July 1, 2026

    Fix Wood Scuffs: Professional Cobbler Secrets for Lasting Results

    July 1, 2026

    Wood Table Scratch: Simple DIY Methods to Restore the Shine

    July 1, 2026
    Add A Comment
    Leave A Reply Cancel Reply

    Welcome to Woodwork Insights
    Welcome to Woodwork Insights

    I’m Evan Markham, the woodworker behind Woodwork Insights. I’ve spent more than twenty years building furniture, testing tools, and working in everyday garage workshops. I created this site to share real, practical woodworking tips that come from hands-on experience, not theory.

    If you enjoy honest advice and straightforward project guides, you’re in the right place.

    About

    Woodwork Insights is a practical woodworking resource created by long-time woodworker Evan Markham. Every guide, tool review, and project tutorial is based on real experience in a working garage shop. Our goal is to give you honest, reliable, and easy-to-follow woodworking advice you can trust.

    • Home
    • About
    • Contact
    • Editorial Guidelines
    • Privacy Policy
    • Disclaimer
    • Terms and Conditions
    • Affiliate Disclosure
    • Cookie Policy
    • Copyright Notice
    • DMCA Notice
    • Accessibility Statement
    © 2026 ThemeSphere. Designed by ThemeSphere.

    Type above and press Enter to search. Press Esc to cancel.